We’re delighted to share this month’s latest updates and improvements now available on the Closd platform.
This month, find out how to save templates to save time when setting up and sending recurring documents for signature.
Table of contents:

Use case
Lawyers often need to create and re-use standard documents from one project to the next, such as NDAs, subscription forms or commercial leases.
To save time on recurring tasks such as creating and setting up signing sessions, it is now possible to create and save standard document templates in Closd to increase the productivity of your project managers.
This means that you can reuse the same document, which has already been set up for several projects on the Closd platform.
In addition to the document itself, the following parameters can be saved:
- the signature type (simple, advanced…)
- the envelope type (single send or bulk send)
- the number of required signatories
- the placement of your signature tags.
How to save a template
There are two ways to create a document template.
1. Create a new template
Go to the Signing checklist menu in your Closd project.
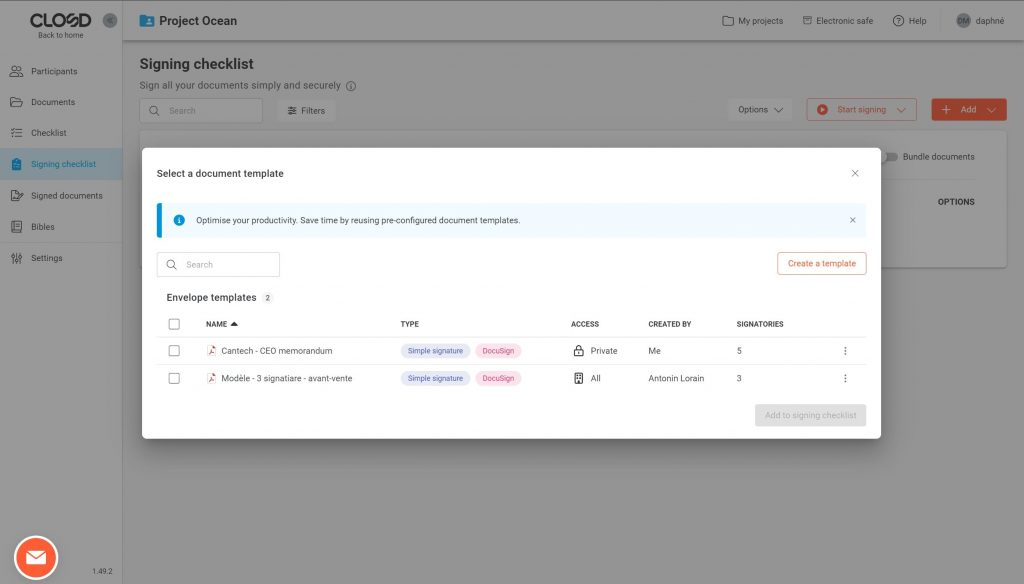
Click on the orange + Add button, then on Use a template. A window with your saved templates will appear. The button at top right allows you to Create a template from scratch. You will then be redirected to an interface similar to regular signing session.
Select the document you wish to use as a template (1. Document selection), then proceed to 2. Template settings.
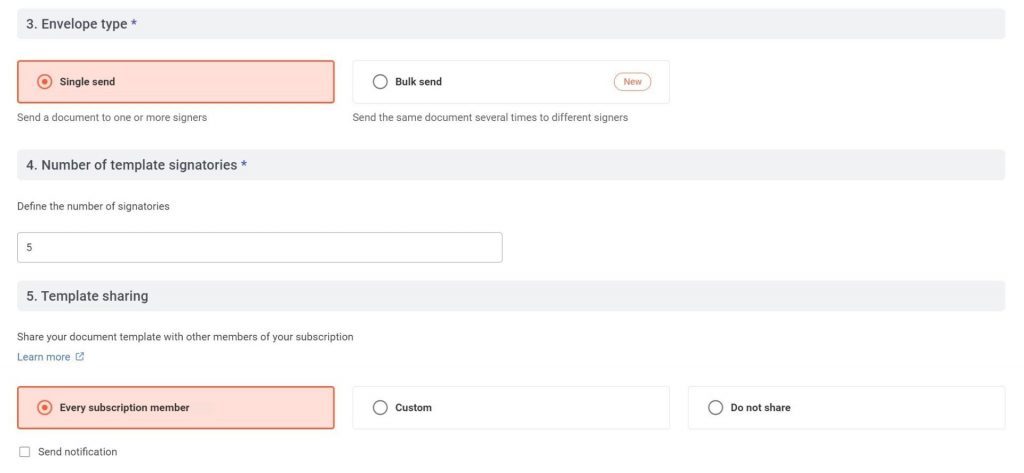
Enter the name of the template, then, as in a normal signing session, select the signature type and the envelope type.
Tip: define a standard naming system that can be easily understood by all subscription users, to facilitate searches in your template library.
You will then be asked to select the Number of template signatories.
You will be able to modify this information at any time.

Then select your Template sharing settings for the model with other members of your subscription:
- Every subscription member: all subscription members, whatever the project and the rights they have been granted, will have access to this template;
- Custom: select individual members among the users of your Closd subscription;
- Do not share: other subscription members will not have access.
The next step in the setup process is to place the 3. Signature tags, just as in a normal signing session, except that instead of placing nominative tags, you will be asked to place generic tags for the generic signatories defined in the previous step: signatory #1, signatory #2, signatory #3…
Once the various elements have been placed, you can save the template.
To find and use the template, click on + Add, then on Use a template.
2. Save a document as a template
It is also possible to create a template from an existing document that has already been set up. To do this, click on the 3 dots to the right of the document listed in the Signing checklist, then click on Save as template.
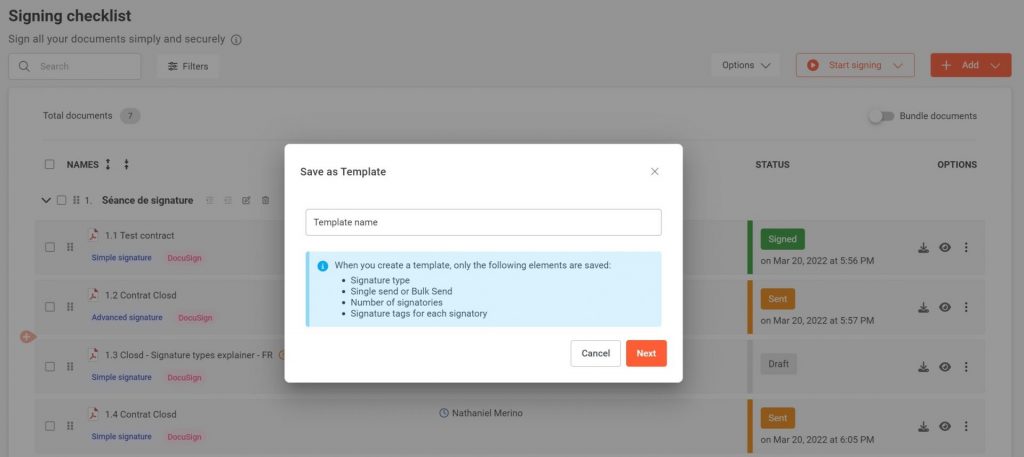
Enter the Template name. The following elements will be saved from existing documents:
- Type of signature
- Envelope type (single send & bulk send)
- Number of signatories
- Signature tags for each signatory
You will then be asked to choose the sharing parameters for your template.
Finally, save the template, which will be added to your template library.
How to use a template
To search for a template in your library, click on + Add, then on Use a template.
Tick one or more documents to select them, then click on the Add to signing checklist button.
You will then be redirected directly to the Settings stage of your signature session. The type of signature and the type of envelope will already be filled in according to the template.
All you have to do is name the document to be signed and assign roles to the various final signatories (signatory, validator, etc.).
Finally, you’ll be redirected to the tag placement step, where the tags have already been placed according to the template, and can be modified at this stage. You can then send the document for signature.
The purpose of this document templates feature is to make you more productive, thanks to predefined and easily modifiable templates.
To find out more about this feature, contact our team for a free demo of the solution, or sign up for our newsletter to stay in touch with our updates!